Purchasing for added developed controls? Dive into topics be pleased customizing settings, the utilize of offline bag admission to, and managing photos photos backups in our developed Power for desktop e-book.
Study about Google Power for desktop advantages
Install Google Power for desktop
Crucial: Sooner than you inaugurate, test that your operating system is be pleased minded with Google Power for desktop.
- Download Google Power for desktop:
- Initiate “GoogleDriveSetup.exe.”
- Apply the on-hide instructions.
Tip: If you utilize a piece or school fable, that you can no longer be ready to make utilize of Google Power for desktop or your organization would possibly should install it for you. If that you can occupy questions, quiz your administrator.
On Google Power for desktop, on the backside just correct, within the system tray, that you can receive the Google Power for desktop menu .
Tip: To ”Present hidden icons,” click the arrow.
To create it less complicated to search out Google Power for desktop when it’s closed, that you can pin it.
Crucial: Sooner than you inaugurate, test that your operating system is be pleased minded with Google Power for desktop.
- Download Google Power for desktop:
- Initiate “GoogleDrive.dmg.”
- Apply the on-hide instructions.
Tip: If you utilize a piece or school fable, that you can no longer be ready to make utilize of Google Power for desktop. Your organization should install it for you. If that you can occupy questions, quiz your administrator.
On Google Power for desktop, on the pause just correct, within the menu bar, that you can receive the Google Power for desktop menu .
To create it less complicated to search out Google Power for desktop when it’s closed, that you can pin it.
- So as to add Google Power to your Dock: Within the “Applications” folder, trudge the Google Power app to the left side of the just no longer too long within the past dilapidated apps separator line.
Register to Google Power for desktop
Register for the first time
For this same video with audio descriptions, dawdle to Launch with Google Power for Desktop.
For those that birth Google Power for desktop for the first time, or after your fable has been disconnected, to log in:
- In your computer, birth Google Power for desktop
.
- Click Launch
Register.
- Register to the Google Yarn you wish make utilize of with Google Power for desktop.
Tip: You will be ready to utilize as much as 4 accounts at one time with Google Power for desktop. Study to make utilize of a pair of accounts on the identical time.
Exercise a pair of accounts on the identical time
You will be ready to utilize as much as 4 accounts at one time with Google Power for desktop.
Add an fable
- In your computer, click the Google Power for desktop menu
- Within the pause just correct-hand nook, click your profile image
- Register by your browser.
- Restart Google Power for desktop.
Disconnect an fable
Crucial: If a streaming fable is disconnected, any offline files are eliminated.
- In your computer, click the Google Power for desktop menu
- Click your profile image
- Within the pop-up window, click OK.
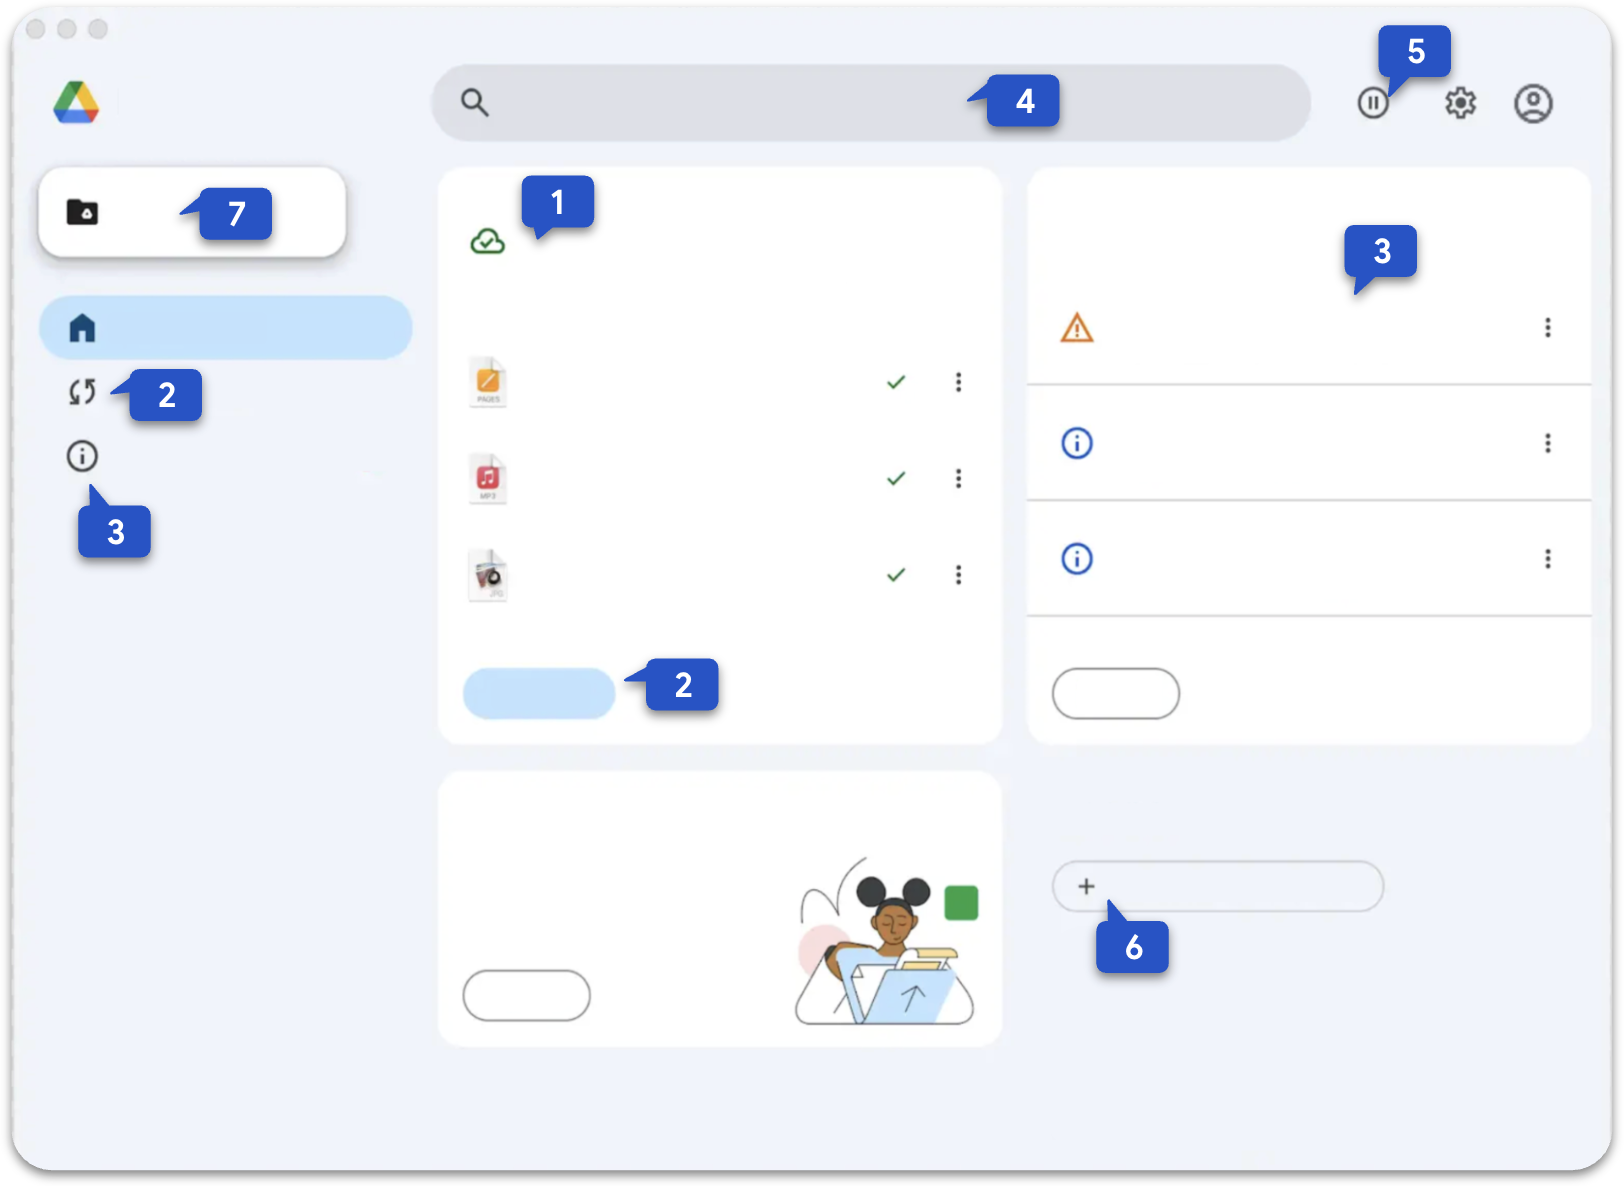
Navigate key beneficial properties in Google Power for desktop
- Take a look at sync put: In your homepage, the recent “Sync put” tile displays your just no longer too long within the past synced files and most up-to-date sync job. It replaces the old “Exercise” have faith.
- Regain detailed sync job: A total list of all most up-to-date sync job.
- Uncover notifications: Crucial updates, be pleased time-soft sync errors, hide for your notifications.
- Exercise enhanced search: Search straight internal Google Power for desktop to search out all files from your streamed Google Power put, unlike Dwelling windows Search or macOS Highlight.
- Tip: For a snappy search, utilize a search hotkey combination. The default values for the quest hotkey are:
- Dwelling windows: Ctrl Alt g.
- macOS: [Command icon] [Accent icon] g. You will be ready to role up your hotkey in developed settings.
- Tip: For a snappy search, utilize a search hotkey combination. The default values for the quest hotkey are:
- Like straightforward sync abet watch over: You will be ready to discontinuance or resume the sync path of of Google Power for desktop at any time.
- Add recent folders to sync: Sync extra folders to your computer with Google Power.
- Uncover admission to your synced files: As soon as your files are synced, that you can bag admission to them from two main locations:
- Thru the Power for desktop app: Click the folder icon to browse all of your Power files. You will be ready to also utilize the quest bar within the app to search out a utter file.
- Straight to your computer: Initiate File Explorer (on Dwelling windows) or Finder (on macOS) and navigate to the Google Power folder. Right here you would possibly receive “My Power,” “Shared drives,” and diversified synced folders.
To birth a file, double-click it. Info in Google Doctors, Sheets, and Slides birth for your web browser, while diversified files birth in their default desktop capabilities.
Tip: In case your Google Power and “My Power” folder are empty, you won’t receive the “Shared drives” or “Different computers” views.
Portion your suggestions
To share your suggestions and file any factors:
- In your computer, click the Google Power for desktop menu
- At the pause just correct, click Settings
Purchasing for added developed controls? Dive into topics be pleased customizing settings, the utilize of offline bag admission to, and managing photos backups in our developed Power for desktop e-book.

 By
By